Published: May 20, 2026 Last Updated 2 months ago by FPN
Let us be honest with ourselves for a moment. You have probably had that morning. You wake up, do your skincare routine, apply your foundation with careful precision, and then reach for your highlighter.
You dab a little on your cheekbones. It looks good. You dab a little more. It looks better. Then, under the unforgiving glare of natural light, you catch your reflection and freeze. What happened? That beautiful, dewy glow you were aiming for now looks suspiciously like you just finished a spin class. Your cheekbones are shimmering, your nose is gleaming, and somehow you have gone from radiant to greasy in the span of thirty seconds.
Do not worry. You are not alone. The highlighter test, that moment of truth when you check your glow in different lighting, has humiliated even the most confident women who wear makeup. It is a rite of passage. But it does not have to be a permanent struggle.
Highlighter is arguably the most misunderstood product in your makeup bag. If used correctly, a highlighter can lift your face, brighten your eyes, and give you that coveted lit-from-within radiance that makes people ask, “What are you using on your skin?”
Used incorrectly, a highlighter can emphasize every pore, settle into every fine line, and make you look like you have been sweating profusely. The difference between these two outcomes is not luck. It is knowledge. It is knowing which formula works for your skin type, knowing exactly where to place the product, and knowing when to stop.
 Photo Courtesy
 This guide will teach you everything you need to know to pass the highlighter test every single time. You will learn specific placement techniques that lift your face rather than drag it down. You will also discover which formulas work best for oily, dry, and combination skin. And finally, you will understand why some highlighters make you look greasy, and others make you look glowing.
By the time you finish reading, you will never fear the highlighter again. Let us begin.
Understanding Highlighter Formulas
The first step to achieving a natural glow is choosing the right formula for your skin type. Not all highlighters are created equal, and using the wrong texture can sabotage your look before you even begin.
Powder highlighters are ideal for oily or combination skin because they sit on the skin’s surface without adding extra moisture. Powder highlighters are easy to layer and control, making them beginner-friendly. If you struggle with excess shine throughout the day, a finely milled powder highlighter will give you that glow without increasing oil production on your face.
Cream and stick highlighters, on the other hand, blend seamlessly into the skin and work best for dry or mature complexions. Cream highlighters add hydration and mimic natural skin radiance in a way that powders simply cannot. If your skin tends to feel tight or flaky, a cream formula will melt into your skin rather than sitting on top and emphasizing dry patches.
 Photo Courtesy
 Liquid highlighters can be mixed with foundation for an all-over glow or applied directly to the high points of the face for targeted luminosity. Liquid highlighters are especially popular for “glass skin” looks and work well on most skin types, though those with very oily skin should use them sparingly.
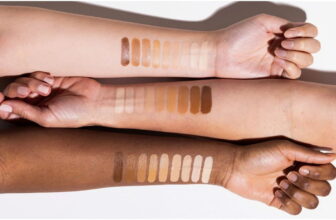
Here is a quick rule of thumb from the experts: “If your skin is dry, a dewy cream highlighter will look like healthy skin—not like you’ve dipped your cheekbones in glitter.” For oily skin, powder is your friend. For everyone else, it comes down to personal preference and the finish you are trying to achieve.
The finish of your highlighter matters just as much as the formula. Look for terms like “sheen,” “luminous,” “pearl,” and “satin” on the packaging. Avoid anything labeled “intense shimmer,” “disco ball finish,” or “ultra-reflective” unless you are going to a party or a photoshoot. For everyday wear, subtlety is everything.
The Golden Rules of Placement
Where you put your highlighter is just as important as what you put on your face. The goal is to mimic where light naturally hits your skin, enhancing your features rather than creating harsh lines or oily patches.
The classic areas for highlighter application are the high points of the face: the tops of the cheekbones, the brow bones, the bridge of the nose, the inner corners of the eyes, and the Cupid’s bow above your upper lip. These are the areas that catch sunlight naturally, so adding a touch of shimmer there will look organic and believable.
For your cheekbones, apply highlighter just above your blush, following the natural curve of your bone structure. Sweep upwards and outwards toward your temples for a subtle lifting effect. On your nose, a light tap down the bridge adds dimension, but keep it minimal. Too much highlighter on the nose can easily cross over into greasy territory.
 Photo Courtesy
 Your Cupid’s bow deserves special attention. A tiny dab of highlighter just above your upper lip enhances fullness and catches light beautifully, making your lips appear plumper without any injections. The inner corners of your eyes are another power spot: a touch of highlighter there brightens tired eyes instantly and creates an awake, refreshed appearance.
Here is what to avoid. Never apply highlighter to the tip of your nose. “To me, it just looks distracting,” says celebrity makeup artist Gita Bass.
“Same with highlighting the sides of the nose—it tends to make the skin look greasy.” Also, avoid large flat surfaces like the center of your forehead or your chin unless you are going for an editorial or stage makeup look. For everyday wear, less is always more.
Application Techniques That Work
Once you have chosen your formula and mapped out your placement, it is time to apply. This is where many women go wrong, but a few simple techniques will keep your glow looking natural.
For cream and liquid highlighters, your fingers are your best tool. “Highlighter melts right in when you use your hands,” says makeup artist Matin. The warmth of your skin helps the product blend seamlessly without streaks or harsh lines. Pat and press the product into your skin rather than swiping or dragging. This tapping motion ensures the highlighter stays where you place it and does not disturb the foundation beneath.
If you prefer to use a brush, choose a small tapered brush for powders and a damp beauty sponge for creams and liquids. A damp sponge helps press the product into your skin for a seamless, airbrushed finish.
For powder highlighters, tap off excess product before applying to avoid dumping too much color onto your face at once.
 Photo Courtesy
 Start with a small amount and build gradually. It is much easier to add more highlighter than it is to remove excess without messing up the rest of your makeup. If you do overdo it, do not panic. A damp sponge can knock back the intensity, and, if needed, a light dusting of translucent powder over the area will tone things down.
Blending is non-negotiable. Harsh lines or concentrated patches scream “overdone.” Always blend the edges of your highlighter into the surrounding skin using a clean brush or sponge. You should not be able to tell exactly where the highlighter begins or ends; it should fade naturally into your skin.
Common Mistakes to Avoid
Even experienced makeup users can fall into highlighting traps. Here are the most frequent errors and how to avoid them.
- Using too much product at once is the number one mistake.
It is tempting to go heavy-handed, especially with beautiful shimmery formulas. Instead, start with a tiny amount and build slowly. You can always add more, but removing excess without disrupting your base is tricky.
- Ignoring your skin’s texture is another common pitfall.
If you have large pores, active breakouts, or fine lines, chunky glitter or thick cream highlighters can settle into crevices and emphasize imperfections. Opt for finely milled powders or lightweight liquid formulas that blur rather than accentuate texture.
- Choosing the wrong shade for your skin tone can ruin an otherwise perfect application.
A highlighter that is too light will look ashy; one that is too dark will look muddy. As a general rule, choose a shade that is one or two shades lighter than your skin tone.
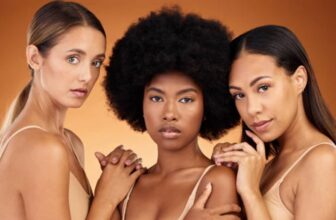
For cool undertones, look for pearly or silvery highlighters. For warm undertones, gold and peach tones work beautifully. Deep skin tones shine with copper or bronze hues.
- Forgetting to blend is a cardinal sin.
Harsh lines or concentrated patches scream amateur. Always blend edges into surrounding skin until the transition is invisible.
- Using the same highlighter year-round can also cause problems.
Your skin tone changes with the seasons. A winter highlighter that looks beautiful in December might look ashy and strange in July after you have developed a summer tan. Adjust your shade as your skin darkens or lightens.
Recommended Highlighters for Every Skin Type
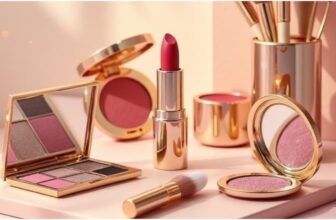
Now that you know how to choose and apply a highlighter, here are five exceptional products to add to your collection. Each one has been selected for its ability to deliver a natural, non-greasy glow.
Kosas Shiny Objects Highlighter
This wet-pressed powder highlighter offers the best of both worlds: the convenience of a compact powder with the radiant, glass-like finish of a liquid.
Kosas Shiny Objects Highlighter is infused with passionfruit extract, which nourishes as you wear it, and melts into your skin without powder fallout or texture. You can even use your fingers to apply it, making it perfect for on-the-go touch-ups.
Key features: Wet-pressed powder formula, glass-like finish, nourishing ingredients, finger-friendly application.
 Photo Courtesy
 Charlotte Tilbury Beauty Light Wand in Pillow Talk
This cult-favorite liquid highlighter became a TikTok phenomenon for good reason. A few glides and dabs followed by a pat with your fingers across the high points of your face unveils a smooth, filter-like finish and Hollywood-worthy radiance.
The Charlotte Tilbury Beauty Light Wand is highlighting perfection for those who believe the glow is the limit. The only downside is that it is a constant sell-out, so grab it while you can.
Key features: Liquid formula, filter-like finish, easy to blend, iconic Pillow Talk shade.
 Photo Courtesy
 RMS Beauty Luminizer
This little pot of creamy goodness is one of the best highlighters for women who lean towards a more natural dew. Formulated with organic coconut oil, vitamin E, and castor seed oil, RMS Beauty Luminizer is as nourishing as it is illuminating.
Use your fingers or a brush to blend over the cheekbones, brow bones, down the bridge of the nose, and at the bow of the lips for a subtle, sexy shimmer. It can also be applied anywhere on the body for gorgeous, glowing skin.
Key features: Cream formula, organic nourishing ingredients, multi-use (face and body), natural dewy finish.
 Photo Courtesy
e.l.f. Halo Glow Highlighter Wand in Champagne Campaign
This affordable liquid highlighter wand delivers a dewy glow with a lightweight, hydrating formula infused with squalane. e.l.f. Halo Glow Highlighter Wand in Champagne Campaign is buildable and blendable, designed to give a lit-from-within finish without feeling heavy on the skin. The wand applicator makes it easy to apply the product precisely where you want it, and the champagne shade flatters a wide range of skin tones.
Key features: Liquid formula, affordable price point, infused with squalane for hydration, precise wand applicator.
 Photo Courtesy
 Hourglass Ambient Lighting Palette – Volume III
For women who prefer powder, this high-end palette is a game-changer. Made with Photoluminescent Technology, which captures, diffuses, and softens surrounding light to refine skin’s appearance, these near-magical powders create a multi-dimensional glow. This particular volume features a trio of coppery, metallic, and golden hues, making the Hourglass Ambient Lighting Palette – Volume III a beautiful option for medium to deep skin tones.
Key features: Powder formula with Photoluminescent Technology, multi-dimensional finish, three shades in one palette, ideal for deeper skin tones.
 Photo Courtesy
 The perfect highlighter application is not about following rigid rules. It is about understanding your skin, choosing products that work for you, and applying them with intention rather than habit.
The difference between a radiant glow and a greasy mess often comes down to just a few small adjustments: using less product, placing it higher on your cheekbones, blending more thoroughly, and matching the formula to your skin type.
Start with a light hand. Focus on the high points. Blend until you can no longer tell where the highlighter begins. And remember that great skin prep is the foundation of any good glow. Exfoliated, moisturized skin reflects light better than any product ever could.
Photo Courtesy
You May Also Like:
Zendaya's Makeup Artist Reveals The Three Eyeshadows Behind Her Odyssey Premiere Look
July 17, 2026The Best Foundation isn't Always the Most Expensive
July 15, 2026Here's Why People are Taking a Break From Retinol in their Skincare Routines
July 6, 2026The Rise of AI-Powered Skincare Routines
July 1, 2026Cherub Cheeks Are Beauty's Newest Obsession
June 29, 2026Beach Skin vs Glass Skin: Which Summer Skin Trend is Winning?
June 25, 20268 Best Tinted Sunscreens for Coverage and Daily SPF Protection
June 23, 2026The Skincare Habits that Make a Difference in Summer
June 22, 2026Polyglutamic Acid May Be the Secret to Plumper, More Hydrated Skin
June 21, 20267 Good Reasons You Should Break Up with Your Makeup Artist
June 16, 2026Olandria Carthen and Painted by Esther Champion MAC Cosmetics’ Blush for Dark Skin
May 29, 20267 Best Liquid Eyeliners for Clean Lines and Dramatic Wings Alike
May 15, 2026

Esther Ejoh is a Fashion Editor at Fashion Police Nigeria, where she writes all things fashion, beauty, and celebrity style, with a sharp eye and an even sharper pen. She’s the girl who’ll break down a Met Gala look one minute, rave about a Nigerian beauty brand the next, and still find time to binge a movie or get lost in a novel. Style, storytelling, and self-care? That’s her holy trinity.