Published: September 12, 2022 Last Updated 2 months ago by FPN SEO
Over time, a twist out has established itself as the ideal natural hairstyle. It entails sectioning your hair into twists, letting the twists dry and set, and then untwisting them to generate gorgeous waves. Although countless natural hairstyles exist, the perfect twist-out will always be the most popular. In addition to being a great protective style, hair twists are also cool and stylish. This low-maintenance hairstyle is made even more gorgeous by the eye-catching spiral curls you get after untwisting the twists. Trying it out may be as simple as twisting the hair and taking it out, but it may also be quite complicated.
To be clear, twist-out is a gorgeous hairdo but is not always successful due to their usual frizz and poor curl definition issues. In fact, some twist-outs come out looking like horrible electric waves. Oops, that was hard. Anyway, we apologize for every time you have attempted and didn’t get satisfactory results. Moving forward, take a look at our guide on how to achieve a perfect twist-out.
Step 1: Section your hair
Every great twist out starts with proper planning and intentionality. Sectioning makes it easier to engage the twists while keeping excess hair out of the way. Make sure to thoroughly wash and shampoo your hair before beginning this step. Starting off with clean hair is ideal! It’s also a good idea to start by imagining how you want your twist-out to turn out in the end. Do you desire a side part or a middle part? Which way, left or right, do you want the hair to fall? Do you prefer big and fluffy looks or lots of definition? All of this will affect how you install your twists.
Step 2: Hydrate your hair
Grab a spray bottle and moisten your curls with water because to create the perfect twist-outs, damp hair is the easiest to work with.
Step 3: Moisturize your hair
Moisture is quite essential to twist-outs. Apply a leave-in conditioner to a section of your hair, follow with your favorite oil, and finish with your preferred curl-holding creme. The purpose of conditioning is to lock in moisture and nutrients, make hair incredibly soft and manageable, and prepare it for the ideal twists.
Step 4: Detangle your hair
This step is made simple by moisturizing or conditioning your hair. Your mane must be detangled if you want gleaming, smooth curls. Take out those knots in the active hair section with a wide-tooth comb or your fingers.
Step 5: Twist your hair
Once your hair is properly sectioned, hydrated, moisturized, and free of knots, choose the size of your twists and take a small section of hair to twist. For the best curl definition, dab some curl-holding creme or gel onto the mini section and brush through with your detangling brush. Make sure to incorporate your edges into your twists when working the edges of your head.
A stunning twist-out can be achieved in a variety of ways highlighted below:
- Single-strand Twists: They are also known as finger coils and are the more time-consuming option. They work best when done as small twists and require a lot of gel. Simply begin at the root and twist your hair inward or outward until you have formed a coil.
- Two-strand Twists: This is the most typical natural hair twist. It can be done by taking a small section of hair and twisting and dividing it into two strands. Once you’ve reached the ends, spread the hair out and start to twist it over and under. Apply a small amount of gel to the ends and curl them with your finger.
- Flat Twists: You can choose a flat twist if you want to get some serious curl definition from the root up. A flat twist resembles a two-strand cornrow quite closely. Section a row of hair, divide the top of the row into two strands, and start to twist the two strands over and under while keeping the twist flat on the scalp.
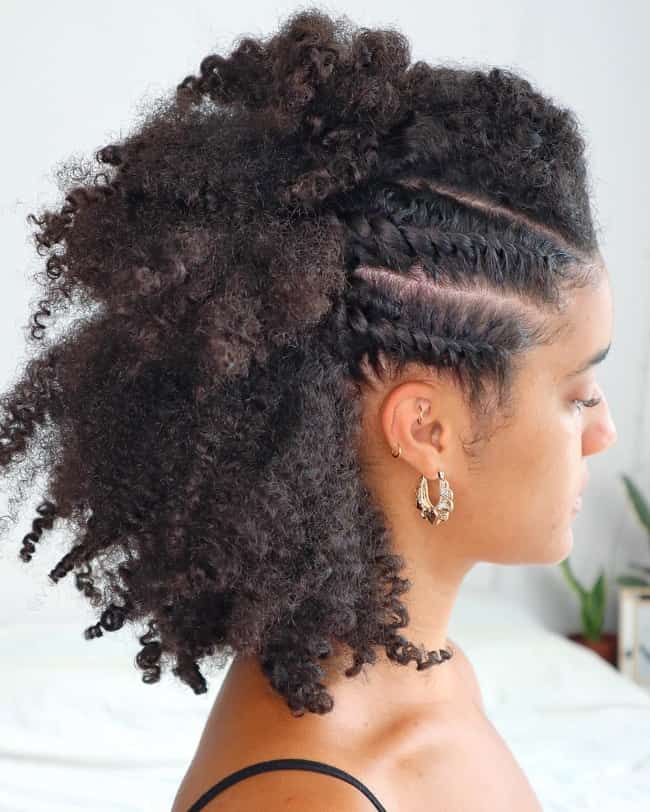 Photo: Instagram.com/abbiecurls
 Step 6: Dry and maintain your hair
A twist won’t properly set if it is too wet, whether from your hair conditioning and moisturizing product or water. Prior to releasing your curls, let your hair dry completely. It is important also to note that a slight hint of moisture can cause frizz on your hair. So, feel free to air dry or use a hooded dryer to activate ingredients that will make your hair shine. Wrap your hair in a silk or satin scarf at night for proper maintenance to keep your strands supple and moisturized.
Step 7: Untwist your hair in the right way
Avoid rushing the process of removing your twists. If done incorrectly, If not done properly, this last step can make or break your flawless twist-out. To unravel your twists, first, lubricate your fingertips with your preferred oil.
Below are the untwisting instructions for various styles:
- Single-strand twists: You’re about to say hello to the most luscious curls ever, so baby, go easy! Unravel these finger coils by twisting them the other way, dividing them in half, and then twisting each half back into the original direction. When untwisted with some patience and care, finger coils can produce glitzy, shiny curly hair.
- Two-strand twists: To achieve the desired look with these types of twists, gently untwist the hair once beginning at the bottom. Then, feel the hair to determine how much separating is necessary. Use your fingers to separate your curly strands into thinner curly strands depending on how full you want your hairstyle to be. To avoid frizz, make sure to keep your fingertips oiled. You can use a wide-tooth comb to pick your roots for more volume. Also, keep in mind that if you separate more than you intended, it’s already too late.
- Flat twists: You’ll get curls and stretch from flat twists. Beginning at the bottom, unravel your flat twists as you would a two-strand twist.